Adding an Oil cooler from a cb900 - part 3 (Live and Learn)

I poured 3 quarts of oil in the sump with the hope of finishing things up and attempting the first start of the season, but I noticed a really significant leak on the sprocket side of the oil pump cover. CRAP!

After draining the fresh oil, I removed the oil pump cover to discover the issue with the gasket that I cut by hand.  A whole section was missing because I made the mistake of trimming it without double checking it against the pump.

I found a new gasket on eBay  (it's described as New Old Stock, but I can't believe it really is NOS) so ordered it instead of trying to cut another one since the gasket sheets I was finding was a little too thick according to a Reddit poster. It looks like the old timers that told me the oil pump gasket being no longer available was not accurate.

I'm super thankful that I had to remove the oil pump to replace the gasket because I would not have noticed the broken drive gear.  

Fracking Frack! - broke the drive gear

The teeth on the pump did not line up with the teeth on the drive gear on the end of the primary shaft and broke when I was tightening it down. I distinctly recall feeling the pump seat when I was tightening it and remember thinking : "Shit, I hope I didn't break anything". Someone on an Internet forum did mention to be careful at this step and I had instant recall but hoped for the best and tried to move on.  No such luck.

The placement/orientation of the gear in the window looks like I will be able to replace the gear if I can get it off and also if I can find a replacement.  Unfortunately, after researching and figuring out what that part is called, it is no longer available. My only option is to buy the larger primary shaft on eBay to get the little gear on the end.


$40 bucks with shipping for the whole thing.  It will give me the opportunity to see and practice removing the gear and replacing it.  There's a circlip holding the gear in place and I hope it will be a simple replacement with my circlip pliers. I really don't want to split the case to get to the primary shaft.

I think the part is called a 17T oil pump drive gear.


The little window that gives me the possibility of replacing the gear without splitting the case


Here's the gear attached to the whole primary gear as it was shipped to me.


Snap Ring Pliers (3rd use in 10+ years)

Separating the oil pump drive gear
Removing the anti-rotation pin which could fall into the crankcase once the gear is not holding it in place


The oil pump drive gear can certainly be replaced without splitting the engine case, just be prepared to take your time and have lots of precautions or it will not be a good time.

A few gotchas for this procedure:

  • Make sure to stuff a towel in the space below the gear (I lost that anti-rotation pin when it fell somewhere as soon as I removed the broken gear)
  • Removing the circlip with circlip pliers works perfectly, but not for reinstalling due to the angle
  • I laid the bike down on the right side to install the circlip with a pick and half of the circlip pliers
  • When installing the oil pump, carefully insert it and lightly turn the pump body until the gears mesh with the primary shaft, then turn the pump body until the mounting holes line up
  • Pouring some used oil in the hole did not flush out the missing pin so I needed to drop the oil pan to look for it. I'm happy it didn't get stuck somewhere else. I could have left it in the pan, but it's ultimately safer to remove it in case it migrates into the oil cooler or somewhere else and cause oil pressure issues. (don't rush, do the right thing)
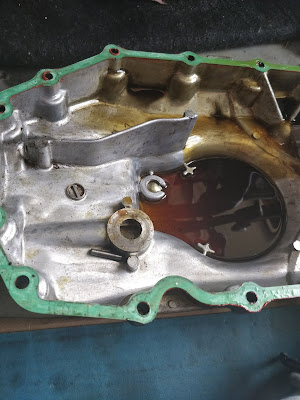


That pin was not going to be flushed out with oil,
but it's safer to find and remove it in case it migrates
somewhere and clogs oil flow.


Layed down for easier access. I could use a lift or a work platform.


My hand is still healing from Carpal Tunnel Release surgery.  While the incision is healed, I still can't lift heavy things and apply pressure at certain angles. It will be safer to not ride for a few more weeks. In the mean time, I still need to re-assemble and see if the oil actually flows into the cooler.

This bike is teetering on being not rideable if the oil cooler upgrade is a bust or if the gear replacement is not perfect.  I hope a new or rebuilt engine is not in the cards, because I will probably just never come back to this project and walk away from it.

**UPDATE August 2021**
She stumbled to life after a long hiatus this afternoon.  No oil pressure warnings and the oil cooler warmed up while the bike idled in the garage so the oil cooler swap was a success. I need to ride it around before I do anything else to it so I can finish shaking out all the changes over the last few years.  The next set of changes will all be geared toward reliability or safety.

Comments

Popular posts from this blog

how to open your door when neither handle works

My recently acquired 2003 Honda Accord EX 4 cyl had a faulty door lock actuator in the front passenger side door.  Here is a run down of what I did wrong in case you find yourself in a similiar situation. Shopping for door lock actuators - Prices go from around $10 to over $40. I mistakenly ordered a pair of door lock actuators ($20 for left and right) for a coupe and received 2 black actuators that were not sized correctly for my 4 door sedan which has smaller white actuators. I did not discover the problem until after I had the door panel off and the actuator removed from the door latch assembly. It was hot, the flies were landing on me and drinking my sweat and I just wanted to button the door back up and stay cool inside so I searched for the closest parts store that had the part in stock and went there to buy it for $45. (I did return the 2 wrong parts but did not get a full refund, but I'm ok with that...$16 back in my pocket is better than $0) Reassembling the door l...

GSX-R750 Caruretor swap for the CB750c Part1

As an owner of an early 80s cb750, it quickly becomes obvious that the CV carburetors on these old motorcycles require the original airbox to run properly. It would seem like a minor price to pay for the reliability and dependability that we get with the design since no jetting changes are needed as we change altititude or swap exhausts. The constant vacuum (CV) design automatically compensates for the difference and keeps the bike running happily. Just don't change the airbox or use anything other than the original style airfilter. I got my bike running perfectly so I'm either a glutton for punishment or just a dumb geek who can't leave stuff alone. "If it aint broke, fix it until it is" might be my motto. People tell me I wouldn't be happy with a new bike because there would be nothing to fix. Maybe it's just a way for me to keep my mind busy so I don't have to think how much I hate my job. I started noticing some posts from people on cb1100f...

Universal Speedometer/Tachometer install

I wanted to replace my original speedometer and tachometer for something more compact. I'm not sure why, but the original 85mph speedometer always bothered me. I guess I felt like the bike deserved better even though I've only pinned it once in 10 years of riding.   After casually looking around and almost pulling the trigger on a cheaper universal speedo with an analog sweep needle for the tach, I stumbled across this product. It can be found in all the usual places such as Amazon and eBay but it's usually buried behind 2 or 3 pages of search results with vastly different prices ranging from mid 40s to mid 80s (US$). The description typically includes a listing of what each wire is intended to be connected to, but in typical fashion for these kinds of imported products the English translation leaves a lot to be desired. For example: the product detail notes: "Oil Quantity Indicator" as one of the display areas, but they really mean fuel level (my bike doesn't...